Synology NAS Docker での Jenkins のセットアップ
CI/CD(継続的インテグレーション/継続的デプロイメント)ツールは数多くありますが、Jenkins はライセンス制限がなくオープンソースで便利なツールの 1 つです。 Synology NAS Docker に Jenkins をインストールする方法について話したいと思います。
- https://pkg.jenkins.io/debian
基本環境
Jenkins が動作するには、JDK バージョン 8 以降が必要です。 JDK バージョン 11 をインストールします。
1
2
3
4
5
6
7
8
9
10
apt-get update
apt-get install -y openjdk-11-jdk

java -version
# + --------------------------------------------------------
openjdk version "11.0.21" 2023-10-17
OpenJDK Runtime Environment (build 11.0.21+9-post-Ubuntu-0ubuntu120.04)
OpenJDK 64-Bit Server VM (build 11.0.21+9-post-Ubuntu-0ubuntu120.04, mixed mode, sharing)
# - --------------------------------------------------------
Jenkins パッケージをインストールする
APT を使用して Jenkins をインストールするには、APT にサーバー情報を追加する必要があります。 Jenkins サーバー情報を追加した後、apt update中にキーがないというエラーが発生します。エラーメッセージに表示されたキーを使用してキーをapt-keyに追加します。私の場合、キーは5BA31D57EF5975CAでした。
APT に重要な情報を追加したら、Jenkins をインストールします。
1
2
3
4
5
6
7
8
9
10
11
12
13
14
15
16
17
18
19
20
21
22
23
24
25
26
27
28
29
30
31
32
33
34
35
wget -q -O - https://pkg.jenkins.io/debian/jenkins-ci.org.key | sudo apt-key add -
echo deb http://pkg.jenkins.io/debian-stable binary/ | sudo tee /etc/apt/sources.list.d/jenkins.list

apt-get update
# + --------------------------------------------------------
...
W: GPG error: https://pkg.jenkins.io/debian-stable binary/ Release: The following signatures couldnt be verified because the public key is not available: NO_PUBKEY 5BA31D57EF5975CA
E: The repository 'http://pkg.jenkins.io/debian-stable binary/ Release' is not signed.
...
# - --------------------------------------------------------

apt-key adv --keyserver keyserver.ubuntu.com --recv-keys 5BA31D57EF5975CA
# + --------------------------------------------------------
Executing: /tmp/apt-key-gpghome.d7qO7VDcMV/gpg.1.sh --keyserver keyserver.ubuntu.com --recv-keys 5BA31D57EF5975CA
gpg: key 5BA31D57EF5975CA: public key "Jenkins Project <jenkinsci-board@googlegroups.com>" imported
gpg: Total number processed: 1
gpg:               imported: 1
# - --------------------------------------------------------

apt-get update
# + --------------------------------------------------------
Ign:1 https://pkg.jenkins.io/debian-stable binary/ InRelease
Get:2 https://pkg.jenkins.io/debian-stable binary/ Release [2044 B]
Get:3 https://pkg.jenkins.io/debian-stable binary/ Release.gpg [833 B]
Hit:4 http://archive.ubuntu.com/ubuntu focal InRelease
Hit:5 http://archive.ubuntu.com/ubuntu focal-updates InRelease
Get:6 https://pkg.jenkins.io/debian-stable binary/ Packages [29.6 kB]
Hit:7 http://archive.ubuntu.com/ubuntu focal-backports InRelease
Hit:8 http://security.ubuntu.com/ubuntu focal-security InRelease
Fetched 32.5 kB in 2s (19.3 kB/s)
Reading package lists... Done
# - --------------------------------------------------------

apt-get install jenkins
Jenkins を Web に接続するためのポート番号は、/etc/default/jenkins ファイルの HTTP_PORT で定義されます。ポート番号を変更する必要がある場合は、8080から希望の値に変更できます。
1
2
3
4
5
6
7

vi /etc/default/jenkins
# + --------------------------------------------------------
# port for HTTP connector (default 8080; disable with -1)
HTTP_PORT=8080
# - --------------------------------------------------------
Synology NAS コンテナ ポートを構成し、Jenkins を実行する
その後、Synology NAS GUI で Ubuntu コンテナを停止し、外部接続用のポートを Jenkins に設定します。コンテナの8080ポートを48080ポートにマッピングしました。
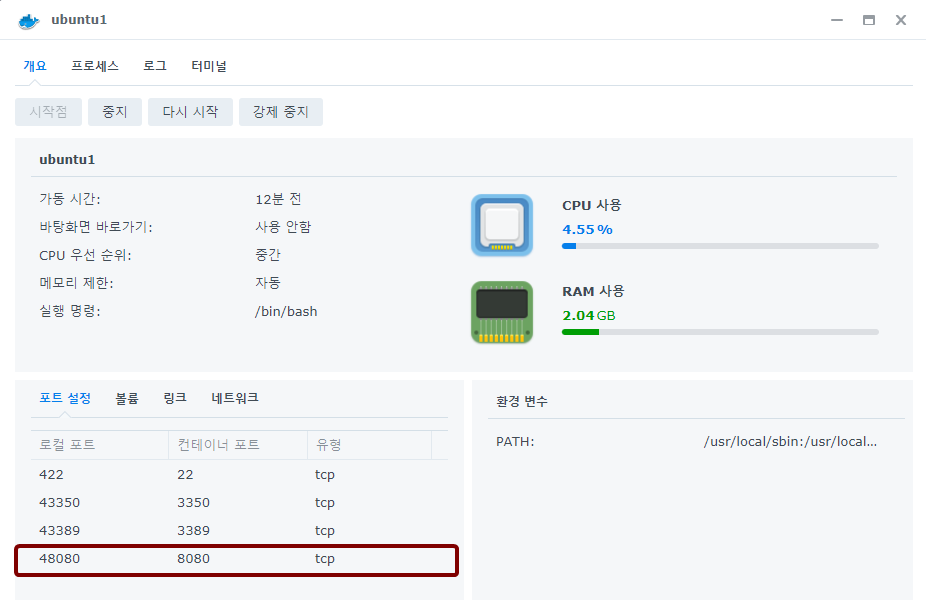 Synology NAS GUI - Docker - Jenkins ポート設定
Ubuntu コンテナを起動し、Jenkins サービスを実行します。つまり、Ubuntu Docker を停止して再起動した場合は、Jenkins サービスを再度実行する必要があります。
1
2
sleep 10
service jenkins restart
次に、Web ブラウザーを使用して Jenkins に接続します。私の場合、Synology NAS に割り当てられた IP アドレスは192.168.0.50で、ポートは上記で設定した48080でした。
- http://192.168.0.50:48080/
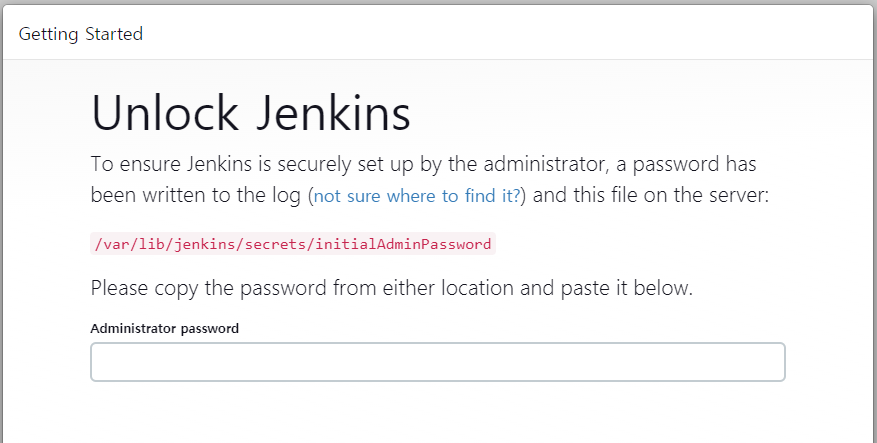 ジェンキンス - はじめに
/var/lib/jenkins/secrets/initialAdminPassword ファイルに書かれた初期パスワードを使用してログインし、Jenkins の初期インストールを続行します。
1
2
3
4
cat /var/lib/jenkins/secrets/initialAdminPassword
# + --------------------------------------------------------
72b349dadd5d4a83bac10060e536189e
# - --------------------------------------------------------